How to Set Up RAGAS and Run Your First LLM Evaluation Test
What is RAGAS?
RAGAS stands for Retrieval-Augmented Generation Assessment. It’s an open-source evaluation framework built specifically to measure the performance of RAG systems (like those that combine vector search with LLMs to answer questions).
In simple terms, RAGAS helps you test how good your LLM-based system is at:
- Retrieving the right documents
- Generating accurate and relevant answers
- Sticking to the facts
In a world where LLMs can sound confident but still be wrong, evaluating their accuracy and reliability is critical, especially when they’re used in customer-facing, medical, legal, or internal tools.
What You’ll Learn in This Guide
In this guide, you’ll learn how to:
- Set up a Python project for LLM evaluation
- Install RAGAS and required dependencies
- Run your first test case using real inputs
- Understand what the evaluation scores mean
Step 1: Prerequisites (Before You Begin)
Before we jump into setting up RAGAS, make sure you have the following ready on your computer.
- Python 3 Installed
RAGAS runs on Python, so you’ll need Python 3.8 or higher.
To check if it’s already installed, open your terminal or command prompt and type.
python3 --version

If you don’t have it, download and install it from: https://www.python.org/downloads/
- A Code Editor (We Recommend PyCharm)
You’ll need a code editor to write and run your Python scripts.
We recommend using PyCharm Community Edition, especially if you’re new to Python. It’s beginner-friendly and has great support for virtual environments.
- Download PyCharm (Community version is enough): https://www.jetbrains.com/pycharm/download/
That’s it! Once these two are ready, you can proceed to the next step: setting up your project.
Step 2: Create Your Project in PyCharm
Now that Python and PyCharm are installed, let’s create your project and set things up inside PyCharm.
- Open PyCharm and Create a New Project
- Launch PyCharm
- Click on “New Project”
- Set the project name as: LlmEvaluation
- Make sure “New environment using Virtualenv” is selected
- Under Base interpreter, choose the same Python version you saw when you ran: python3*—version*
- This makes sure you’re using the right version of Python.
- Click Create
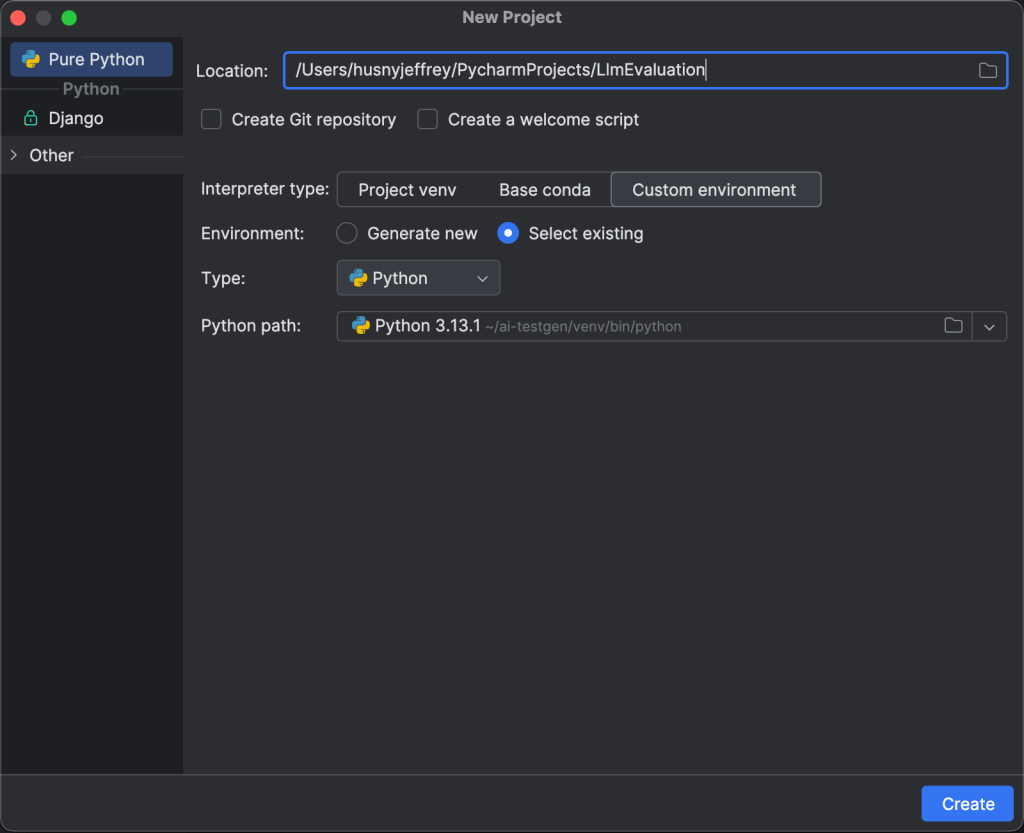
You’ll now land in your empty project, ready to install the necessary libraries.
- Install Required Libraries via PyCharm Settings
Go to:
PyCharm → Settings → Project: LlmEvaluation → Python Interpreter
Click the + (Add) button and search for each of these packages:
Once all are added, click Apply and then OK to finish the setup.
| Package | Why You Need It |
|---|---|
| ragas | The main framework for evaluating LLM responses |
| langchain-openai | Lets us connect OpenAI to RAGAS using LangChain’s LLM wrapper |
| pytest | Helps us write and run test cases easily |
| pytest-asyncio | Required to run async test cases (which RAGAS depends on) |
| requests | Used to send API requests to get responses and documents |
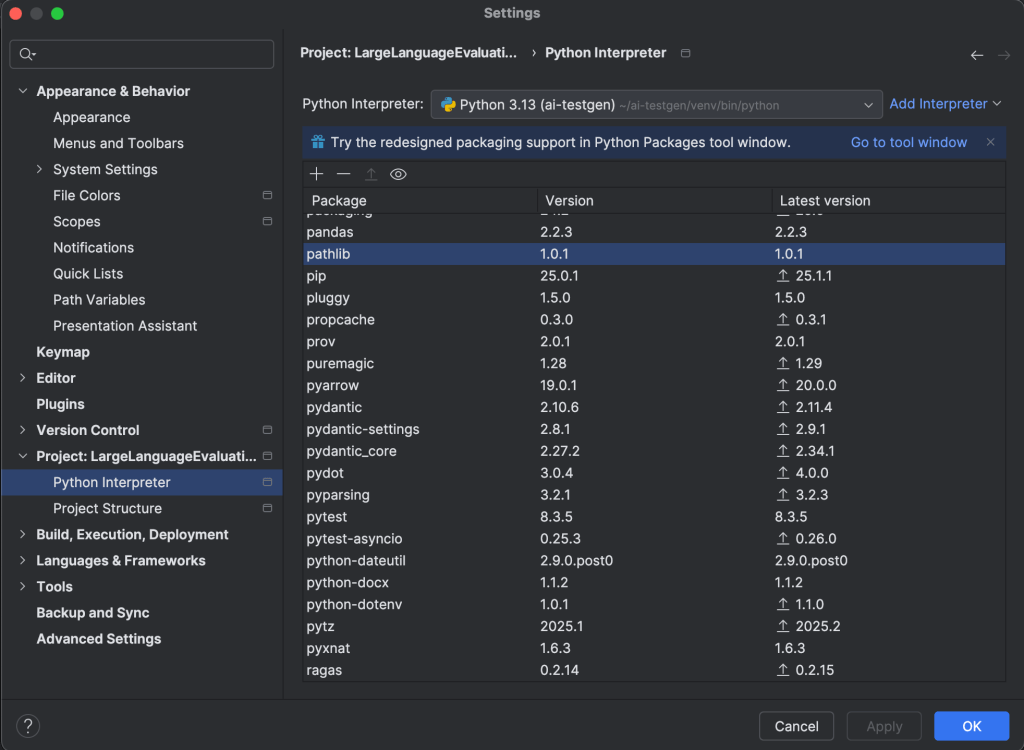
That’s it! You’ve now set up your test project and environment. Next, we’ll write your first test using RAGAS.
Step 3: Write Your First LLM Evaluation Test
Now that your environment is ready and packages are installed, let’s write a simple test to check how well an answer uses the retrieved documents, using a metric called Context Precision.
Create a new Python file
Right-click your LLMEvaluation project folder in PyCharm and select:
New → Python File, Name it: test_context_precision.py
Paste the following code into the file:
					# Pytest -
import os
import pytest
from langchain_openai import ChatOpenAI
from ragas import SingleTurnSample
from ragas.llms import LangchainLLMWrapper
from ragas.metrics import LLMContextPrecisionWithoutReference
@pytest.mark.asyncio
async def test_context_precision():
    # create object of class for that specific metric
    os.environ[
        "OPENAI_API_KEY"] = "replace your API key"
    llm = ChatOpenAI(model="gpt-3.5-turbo",
                     temperature=0)  # If the answer need more explanation, can increase the temperature
    langchain_llm = LangchainLLMWrapper(llm)
    context_precision = LLMContextPrecisionWithoutReference(llm=langchain_llm)
    # Feed data
    sample = SingleTurnSample(
        user_input="What is the cost of living for a single?",
        response="Around S$2,660/month",
        retrieved_contexts=[
            "EP holders living alone spend around S$2,660/month, while S Pass holders spend about S$1,603/month",
            "Monthly expenses range between S$4,800 and S$5,500 for couples without kids. Monthly expenses range between S$6,500 and S$7,500 for couples with kids."]
    )
    # get the score
    score = await context_precision.single_turn_ascore(sample)
    print(score)
    assert score > 0.8
What this does:
- os: Helps set environment variables
- pytest: The testing framework you’ll use to run this test
- ChatOpenAI: Lets us talk to OpenAI’s GPT model
- SingleTurnSample: Represents a single question-answer pair + context
- LangchainLLMWrapper: Converts the LLM into a format RAGAS understands
- LLMContextPrecisionWithoutReference: The metric we are going to test
					@pytest.mark.asyncio
async def test_context_precision():
This defines your test function. Since RAGAS runs LLM calls asynchronously, we use async + @pytest.mark.asyncio to support that.
os.environ["OPENAI_API_KEY"] = "your-api-key-here"
Replace “your-api-key-here” with your real OpenAI API key (or load it from a .env file for better security). This lets the code connect to GPT-3.5.
llm = ChatOpenAI(model="gpt-3.5-turbo", temperature=0)
This line sets up the GPT model.
- We’re using “gpt-3.5-turbo”
- temperature=0 keeps the answer consistent and focused
langchain_llm = LangchainLLMWrapper(llm)
This wraps the LLM in a format that RAGAS understands internally.
What’s LangChain Doing Here?
LangChain is a Python library that makes it easier to work with large language models like GPT.
In this setup, we use LangChain’s ChatOpenAI class to talk to OpenAI’s GPT model, and the *LangchainLLMWrapper* to convert it into a format that RAGAS understands.
- Think of LangChain as a bridge between:
- You (the developer)
GPT (the model) - RAGAS (the evaluation tool)
Without this wrapper, RAGAS wouldn’t be able to communicate directly with the LLM. That’s why wrapping your model using LangChain is a required step.
context_precision = LLMContextPrecisionWithoutReference(llm=langchain_llm)
Now we create the actual metric object:
Context Precision checks:
“Out of all the documents retrieved, how many were actually useful in answering the question?”
					    sample = SingleTurnSample(
        user_input="What is the cost of living for a single?",
        response="Around S$2,660/month",
        retrieved_contexts=[
            "EP holders living alone spend around S$2,660/month, while S Pass holders spend about S$1,603/month",
            "Monthly expenses range between S$4,800 and S$5,500 for couples without kids. Monthly expenses range between S$6,500 and S$7,500 for couples with kids."]
    )
Here we define a test input:
- user_input: The actual question
- response: What the LLM answered
- retrieved_contexts: The documents that were retrieved from the database
RAGAS will evaluate how well the answer matches the context.
This is Mock Data for Learning
- For simplicity, we’ve hardcoded the user_input, response, and retrieved_contexts in this test.
- But in a real-world scenario, these values should come dynamically from your RAG API.
- Here’s what that means:
- The user_input would be the question a user asks.
- The response should be the actual output from your LLM (after RAG).
- The retrieved_contexts should be the documents returned by your vector database or retrieval pipeline (not manually typed).
					    score = await context_precision.single_turn_ascore(sample)
    print(score)
This runs the actual test and prints the precision score — a value between 0 and 1.
- 1.0 means all retrieved context was relevant
- 0.0 means none of it helped answer the question
assert score > 0.8
✅ Finally, we’re saying: “We expect this test to pass only if the score is above 0.8.”
That means at least 80% of the retrieved context should be useful.
How to Run the Test
Open your terminal (inside PyCharm) and run:
pytest test_context_precision.py
You’ll see output showing whether the test passed and the actual score.
					============================= test session starts ==============================
collecting ... collected 1 item
test_context_precision.py::test_context_precision PASSED                                  [100%]0.9999999999
======================== 1 passed, 7 warnings in 2.08s =========================
Try a Failed Case (Low Context Precision)
Let’s now simulate a failed test by giving irrelevant context.
Replace your previous sample = SingleTurnSample(…) block with this:
					sample = SingleTurnSample(
    user_input="What is the cost of living for a single in Singapore?",
    response="Couldn't find answer",
    retrieved_contexts=[
        "Singapore is known for its cultural diversity and vibrant nightlife.",
        "Tourist arrivals in Singapore dropped significantly in 2020 due to the pandemic."
    ]
)
You’ll see output showing whether the test failed and the actual score.
					============================= test session starts ==============================
collecting ... collected 1 item
test_context_precision.py::test_context_precision FAILED                                  [100%]0.0
Test1.py:10 (test_context_precision)
0.0 != 0.8
Expected :0.8
Actual   :0.0
This shows how RAGAS catches bad retrieval
That’s it! You’ve now successfully set up RAGAS, written your first test case, and learned how to evaluate the quality of your LLM’s answers using context precision. Even though we used hardcoded data for this guide, you now have the foundation to test real RAG systems. In the next article, we’ll explore how to run dynamic evaluations using real API responses. That means instead of hardcoding sample data, we’ll connect to an actual RAG system and evaluate its live answers. Stay tuned!
That’s it for today, guys. Thank You for Reading! I hope you found this article informative and useful.
If you think it could benefit others, please share it on your social media networks with friends and family who might also appreciate it.